8 Quick and Easy Yoga Cool Down Stretches
Reading Time: 5 minutes 5 seconds
BY: ISSA
DATE: 2020-10-22
A proper cool down is an important part of a post-workout routine. Although it may not help reduce muscle soreness (1), it is valuable in helping the body come back to a balanced state. It is important to cool down the muscles, slow the breathing, and normalize the heart rate. The body will cool down on its own with or without yoga. However, yoga can support the process plus it has a variety of other benefits that may be valuable in helping your client end their workout. Check out these eight effective postures and then add them to your favorite post-workout routine.
8 Yoga Cool Down Stretches
Yoga postures can help improve cognition and respiration, reduce blood pressure, and have a positive impact on the body's immune response (2). Consistent yoga can also reduce depression, anxiety, and stress. In addition to the flexibility benefits of yoga postures, cool down stretches can help balance the body, mind, emotions, and spirit (3). The benefits of yoga are powerful. And, the great thing about yoga is that there are numerous postures, variations, and modifications that can help clients unlock many of those benefits. The following yoga postures are a great addition to your cool down stretching routine.
1. The Easy Pose (Sukhasana)
The stretch begins in a cross-legged position on the edge of a folded towel or cushion (hips elevated 2-4") with the body weight balanced on the sit bones. Your client can press their palms together at the front of their chest or relax the back side of their hands on the top of each knee. With a straight spine, your client should focus on elongating their torso from the base of the spine to the top of their head. They will stay in this position and breathe.
Benefits: Stretches the hips
Modifications: If the knees are compromised, use blocks or rolled-up towels as support under the outside of both knees.
2. Child's Pose (Balasana)
The stretch begins in a kneeling position with the tops of the feet pressing into the floor. The toes should be touching and the knees wider than the hips. Your client will rest their glutes on their heels and hinge forward at the hips. They will stretch their arms and spine forward and rest their forehead and arms gently on the ground. The arms can also be placed at the sides with palms facing up. They will stay in this position, focus on keeping the hips back and down, elongate the torso, and breathe.
Benefits: Stretches the back, thighs, and knees
Modifications: If the forehead does not touch the floor, place a towel or cushion between the head and the floor.
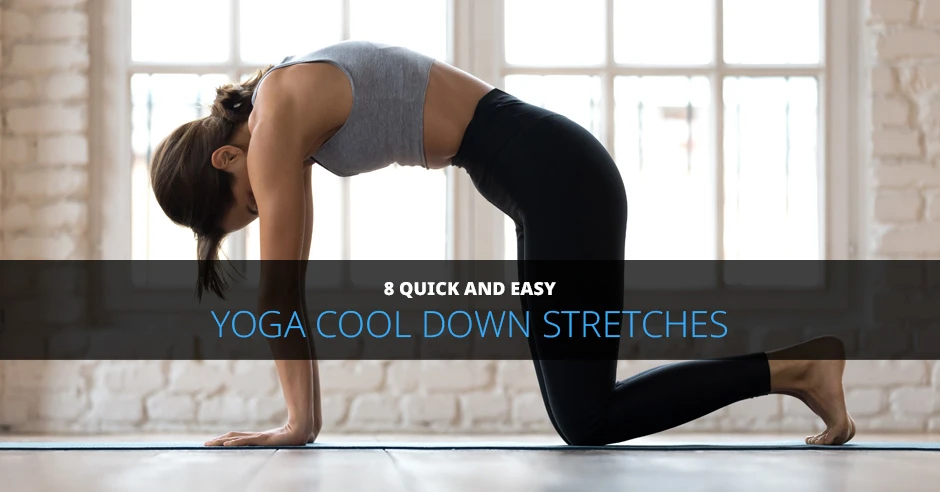
3. Cat Pose (Marjaryasana)
Your client will begin on all fours. The wrists should be under the shoulders and knees under the hips. The fingers should be spread out evenly on the mat. Your client will slowly press their spine up towards the ceiling, keeping their chin tucked and in alignment with the spine. They should focus on rounding the spine, tucking the tailbone, and opening the back of the shoulders as they arch. Slowly and under control, they will come back to the starting position.
Benefits: Stretches the back, shoulders, and spine
Modifications: If knees are compromised, use padding under the knees.
4. Cobbler's Pose (Baddha Konasana)
Your client will begin in a seated position on the yoga mat. They will bring the bottoms of the feet together in front of them and let the right and left knee fall out to the sides. Their hands will gently grip the feet, with their chin up and spine long. They will stay in this position, allowing the hips and spine to stretch.
Benefits: Stretches the inner thighs
Modifications: If knees are compromised, place blocks under the outside of the knees.
5. Lying Twist (Supta Matsyendrasana)
The posture starts with the client lying on their back. With core engaged, arms stretching out to the sides and palms facing up, the client will bring their knees to their chest and then slowly lower them to the right side. Throughout the stretch, the left knee should remain stacked on top of the right knee with the right and left foot stacked as well. The client should focus on keeping both shoulders on the mat allowing their spine to twist and stretch. They will repeat the stretch on the left side as well.
Benefits: Stretches the spine, shoulders, and chest
Modifications: Place a pillow under the knees or in between the knees to lighten the stretch.
6. Squat in Prayer Posture (Malasana)
The posture begins with your client standing with feet wider than the hips and the toes pointed out. Your client will slowly lower into a wide squat sinking the hips below the knees. The hands should be pressed together in prayer position in front of the chest with the elbows gently pressing on the insides of both knees. They will stay in this position and focus on lengthening the spine.
Benefits: Stretches the groin and hips
Modifications: Place foam under the back of heels if heels don't touch the floor in squatting position
7. King Pigeon (Eka Pada Rajakapotasana)
The starting position for this stretch is on all fours (the client can also begin in a plank or down-dog position). They will bring the right leg up to their chest and let the knee open out to the right side so the shin is perpendicular to the torso and the leg is resting on the floor. The left leg should be extended behind them. The hips should be even with weight distributed evenly. With a long spine, they will press down into their hips and tailbone. Walk the left and right arm forward and lead the upper body down towards the floor. They will repeat the stretch on the opposite side of the body.
Benefits: Stretches the hip flexors and glutes
Modifications: Use a folded blanket under the bent leg to help reduce pain in the lower back.
8. Corpse Pose (Savasana)
Your client will begin the yoga pose by lying on their back with their arms slightly away from their body but comfortably at their side with palms facing up. They will allow their left and right foot to gently fall out to the sides. They should begin scanning their body to identify any tense muscles and consciously releasing those areas. They should try to lay as still and relaxed as possible while breathing gently.
Benefits: Calms the mind and helps relax the nervous system
Modification: Use a rolled towel or cushion as support under the knees or calves, if needed.
There's a reason yoga has been around for thousands of years. Give these postures a try with your clients. And remember, consistency and form are the keys to unlocking the benefits of each stretch.
Become a yoga instructor and take your personal training to the next level! You will learn the art and science of teaching yoga with the ISSA's Certified Yoga Instructor course. Get started today!
Featured Course
ISSA | Yoga Fundamentals
Learn the benefits of yoga, techniques and tools for teaching, and fundamental information for jump-starting your career.
References
Van Hooren, Bas, and Jonathan M Peake. "Do We Need a Cool-Down After Exercise? A Narrative Review of the Psychophysiological Effects and the Effects on Performance, Injuries and the Long-Term Adaptive Response." Sports medicine (Auckland, N.Z.) vol. 48,7 (2018): 1575-1595.
Balaji, P A et al. "Physiological effects of yogic practices and transcendental meditation in health and disease." North American journal of medical sciencesvol. 4,10 (2012): 442-8.
Woodyard, Catherine. "Exploring the therapeutic effects of yoga and its ability to increase quality of life." International journal of yoga vol. 4,2 (2011): 49-54.